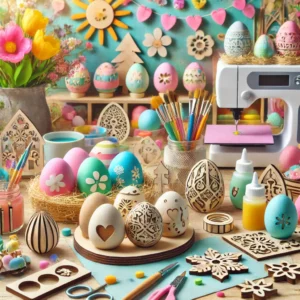
Delmarva Makerspace September 2024 Classes: Join Us for Exciting Learning Opportunities!

As we dive into September, Delmarva Makerspace is excited to offer a variety of engaging classes and events tailored to spark your creativity and enhance your skills. Whether you’re a new member or a seasoned maker, our lineup this month has something for everyone. Mark your calendars and join us for these exciting sessions!

September 2: New Member Orientation @ 7:00 PM
If you’re new to our community, this orientation is the perfect opportunity to get acquainted with Delmarva Makerspace. Learn about our resources, meet fellow makers, and discover how you can make the most out of your membership.

September 11: Laser Safety Training @ 7:00 PM
Safety first! This session is essential for anyone looking to use our laser cutting equipment. You’ll learn about the proper safety protocols to ensure a safe and productive experience in the makerspace.

September 16: Intro to 3D Printing @ 7:00 PM
Curious about 3D printing? This introductory class will walk you through the basics of 3D printing technology, from designing your first project to understanding the mechanics of the printers available at our space.

September 17: Intro to Vinyl Cutting @ 7:00 PM
Vinyl cutting opens up a world of possibilities for your projects, from custom decals to intricate designs. This class will introduce you to the techniques and tools you need to get started with vinyl cutting.

September 18: Woodshop Safety @ 7:00 PM
Our woodshop is one of the most popular areas in the makerspace, and safety is key to enjoying it to the fullest. This session will cover essential safety procedures and guidelines to ensure you can work confidently with our woodworking tools.

September 25: CNC Machine Training @ 7:00 PM
CNC machines are a game-changer for precision cutting and crafting. This training session will teach you how to operate our CNC machines, covering everything from setting up your project to troubleshooting common issues.

Each class is designed to empower you with new skills and knowledge, all within the supportive community of Delmarva Makerspace. Whether you’re interested in high-tech tools like laser cutters and 3D printers or traditional woodworking, we have something for you.

We look forward to seeing you at our September classes! Make sure to reserve your spot today, as spaces are limited. Let’s make something amazing together!

For more details and to register, visit our website or contact us directly. Happy making!

New Extended Hours at Delmarva Makerspace!

You asked for it, and we listened! Starting in September, we’re thrilled to announce that we’re extending our open hours at Delmarva Makerspace. Whether you’re an early bird, a night owl, or somewhere in between, we’ve got you covered. These new hours give you more flexibility to work on your projects, connect with fellow makers, and take advantage of all the resources our space has to offer.

New Hours Schedule:

  • Monday: 12:00 PM – 9:00 PM
  • Tuesday: 5:00 PM – 8:00 PM
  • Wednesday: 6:00 PM – 9:00 PM
  • Thursday: 5:00 PM – 8:00 PM
  • Friday: 10:00 AM – 4:00 PM
  • Saturday: 9:00 AM – 4:00 PM

Whether you’re working on a new invention, crafting something special, or just want to hang out and see what others are creating, our expanded hours are designed to fit into your busy schedule.

Why Should You Join Us? Delmarva Makerspace is more than just a place to work on projects—it’s a community. Our members come from all walks of life, united by a shared passion for making and creating. By joining us during these new hours, you’ll have even more opportunities to:

  • Collaborate with like-minded individuals.
  • Learn new skills through hands-on experience.
  • Share your knowledge and inspire others.

So, come and be part of our tribe! Whether you’re a seasoned maker or just starting out, there’s a place for you here.

See You in September! With our new hours, there’s no excuse not to drop by and see what Delmarva Makerspace is all about. Bring your ideas, your projects, and your passion—we’ll supply the tools and the community.

Don’t miss out on this chance to be part of something bigger. We can’t wait to see what you’ll create with us!

Unleash Your Creativity at Delmarva Makerspace: Beyond 3D Printing

At Delmarva Makerspace, we believe in the limitless potential of creativity. While 3D printing often steals the spotlight, our makerspace is a treasure trove of resources and opportunities that extend far beyond this one technology. Whether you’re a seasoned maker or just starting out, our space is designed to ignite your imagination and help you bring your ideas to life. Here’s a look at some of the amazing things you can do at Delmarva Makerspace—no 3D printer required!

  1. Woodworking Wonders: If you’ve ever dreamed of crafting your own furniture, carving intricate designs, or building a custom project from scratch, our woodworking shop is the place to be. Equipped with everything from basic hand tools to advanced machinery like CNC routers and laser cutters, our woodshop is a haven for creators. Whether you’re making a simple birdhouse or a complex piece of fine furniture, the possibilities are endless.
  2. Electronics and Robotics: Dive into the world of electronics and robotics at Delmarva Makerspace. Our electronics lab is stocked with soldering stations, circuit boards, and all the components you need to design and build your own devices. Whether you’re working on a small DIY electronics project or developing a full-scale robot, you’ll find the tools and support you need to succeed. Plus, our community of tech enthusiasts is always ready to lend a hand or collaborate on a new idea.
  3. Fiber Arts and Textiles: For those who love working with fabrics, yarns, and threads, our fiber arts area is a dream come true. From sewing machines and embroidery tools to knitting and crochet supplies, you’ll find everything you need to create beautiful, handcrafted items. Whether you’re interested in quilting, garment-making, or simply experimenting with new textile techniques, our space is perfect for makers of all skill levels.
  4. Arts and Crafts: Sometimes, the simplest materials can lead to the most creative outcomes. At Delmarva Makerspace, we celebrate all forms of art and craft, from painting and drawing to ceramics and jewelry-making. Our arts and crafts area is stocked with a wide variety of supplies, allowing you to experiment with different mediums and techniques. Whether you’re creating for fun, for gifts, or for sale, this space is perfect for letting your artistic side shine.
  5. Collaborative Projects and Community: One of the greatest strengths of Delmarva Makerspace is our vibrant and supportive community. Whether you’re looking for feedback on a project, advice on a new technique, or simply a group of like-minded individuals to share ideas with, our makerspace provides a collaborative environment where creativity thrives. We regularly host group projects, workshops, and meetups that bring our members together to learn, create, and grow.

At Delmarva Makerspace, the possibilities are truly endless. Beyond 3D printing, our space offers a diverse array of tools, resources, and opportunities for makers of all kinds. Whether you’re interested in woodworking, electronics, textiles, metalworking, or any other creative pursuit, you’ll find a welcoming community and the support you need to bring your ideas to life. Come visit us, take a tour, and discover how Delmarva Makerspace can help you unlock your full creative potential. We can’t wait to see what you’ll make next!

Beginner’s Guide to Getting Started with 3D Printing

Introduction

Welcome to the fascinating world of 3D printing! Whether you’re a hobbyist, an artist, or just curious about the technology, this guide will help you take your first steps into the world of 3D printing. We’ll cover the basics of choosing a 3D printer, essential design tips, and troubleshooting common issues. Let’s get started!

Table of Contents

  1. What is 3D Printing?
  2. Choosing Your First 3D Printer
  3. Essential 3D Printing Tools and Materials
  4. Getting Started with 3D Design
  5. Printing Your First Object
  6. Troubleshooting Common Issues
  7. Advanced Tips and Resources

1. What is 3D Printing?

3D printing, also known as additive manufacturing, is the process of creating three-dimensional objects from a digital file. The printer builds the object layer by layer using materials like plastic, resin, or metal. This technology is used in various fields, from manufacturing to medicine, and offers endless possibilities for creative projects.

2. Choosing Your First 3D Printer

When selecting your first 3D printer, consider the following factors:

  • Type of Printer: The most common types for beginners are FDM (Fused Deposition Modeling) and SLA (Stereolithography). FDM printers are generally more affordable and easier to use, while SLA printers offer higher precision and better surface finish.
  • Budget: Entry-level 3D printers can range from $200 to $500. Determine your budget and look for a printer that offers good value within that range.
  • Build Volume: This is the maximum size of the objects you can print. Consider what size projects you plan to create and choose a printer with an appropriate build volume.
  • Ease of Use: Look for a printer with user-friendly features, such as auto-bed leveling, touchscreen interfaces, and reliable customer support.

3. Essential 3D Printing Tools and Materials

  • Filament/Resin: Depending on your printer type, you’ll need filament (for FDM printers) or resin (for SLA printers). PLA filament is a great starting material due to its ease of use and versatility.
  • Software: You’ll need slicing software to prepare your 3D models for printing. Popular options include Cura, PrusaSlicer, and for more advanced users, Simplify3D.
  • Tools: Basic tools include a scraper for removing prints, calipers for measuring, and tweezers for handling small parts. A good toolkit will make your 3D printing experience smoother.

4. Getting Started with 3D Design

  • CAD Software: To create your own designs, you’ll need CAD (Computer-Aided Design) software. Tinkercad is a beginner-friendly option, while Fusion 360 offers more advanced features for those looking to grow their skills.
  • Downloading Models: Websites like Thingiverse and MyMiniFactory offer thousands of free and paid models that you can download and print.
  • Design Tips: Start with simple shapes and gradually move to more complex designs. Learn about design principles such as overhangs, supports, and infill to improve your print quality.

5. Printing Your First Object

  • Setup: Follow the manufacturer’s instructions to set up your printer. Ensure the bed is leveled and the nozzle is clean.
  • Slicing: Import your 3D model into the slicing software, adjust the settings for your specific printer and material, and generate the G-code file.
  • Printing: Transfer the G-code to your printer and start the print. Monitor the first few layers to ensure everything is going smoothly.

6. Troubleshooting Common Issues

  • Layer Shifting: Ensure the printer is on a stable surface and check for loose belts or pulleys.
  • Warping: Use a heated bed and proper bed adhesion techniques, such as applying a glue stick or using a PEI sheet.
  • Stringing: Adjust the retraction settings in your slicing software and ensure the filament is dry and free of moisture.

7. Advanced Tips and Resources

  • Join Communities: Participate in online forums and local makerspaces like Delmarva Makerspace to exchange tips and get help with troubleshooting.
  • Experiment: Don’t be afraid to experiment with different materials and settings. Each printer and material combination may require unique adjustments.
  • Continuous Learning: Attend workshops, watch tutorials, and read articles to stay updated on the latest advancements in 3D printing technology.

Conclusion

3D printing is an exciting and rewarding hobby that offers endless opportunities for creativity and innovation. By following this guide, you’ll be well on your way to becoming a skilled 3D printing enthusiast. Happy printing!

Exploring Electronics: Fun and Easy Arduino Projects for All Skill Levels

Dive into the World of Arduino!

At Delmarva Makerspace, we love helping our members explore new technologies and expand their skills. Arduino, an open-source electronics platform, offers endless possibilities for creating interactive projects. Whether you’re a complete beginner or an experienced maker, Arduino provides a fun and educational way to dive into electronics and programming. This guide features a range of projects suitable for all skill levels to get you started.

What is Arduino?

Arduino is a versatile microcontroller platform designed for building digital devices and interactive objects. With its simple programming environment and wide variety of compatible sensors and components, Arduino is perfect for both novices and experts. You can use it to control lights, motors, sensors, and more, enabling you to bring your creative ideas to life.

Essential Components

Before starting your Arduino journey, familiarize yourself with these essential components:

  1. Arduino Board: The heart of your project. Popular models include the Arduino Uno and Arduino Nano.
  2. Breadboard: A reusable platform for prototyping circuits without soldering.
  3. Jumper Wires: Wires used to connect components on the breadboard.
  4. Resistors, LEDs, and Buttons: Basic components for simple projects.
  5. Sensors: Devices like temperature sensors, light sensors, and motion detectors that can add interactivity to your projects.

Beginner Projects

1. Blink an LED

A classic first project that introduces you to the basics of Arduino programming.

  • Materials Needed: Arduino board, LED, resistor (220Ω), breadboard, jumper wires.
  • Instructions:
    • Connect the LED to pin 13 on the Arduino board through the resistor.
    • Use the Arduino IDE to write a simple program to turn the LED on and off.
    • Upload the code to the Arduino and watch the LED blink!

Code Example:

void setup() {
  pinMode(13, OUTPUT);
}

void loop() {
  digitalWrite(13, HIGH);  // Turn the LED on
  delay(1000);             // Wait for a second
  digitalWrite(13, LOW);   // Turn the LED off
  delay(1000);             // Wait for a second
}

Intermediate Projects

2. Temperature and Humidity Monitor

Monitor environmental conditions with a DHT11 sensor.

  • Materials Needed: Arduino board, DHT11 sensor, breadboard, jumper wires, LCD display (optional).
  • Instructions:
    • Connect the DHT11 sensor to the Arduino.
    • Use the DHT library in the Arduino IDE to read data from the sensor.
    • Display the readings on the serial monitor or an LCD display.

Code Example:

#include "DHT.h"

#define DHTPIN 2     
#define DHTTYPE DHT11   
DHT dht(DHTPIN, DHTTYPE);

void setup() {
  Serial.begin(9600);
  dht.begin();
}

void loop() {
  float humidity = dht.readHumidity();
  float temperature = dht.readTemperature();

  if (isnan(humidity) || isnan(temperature)) {
    Serial.println("Failed to read from DHT sensor!");
    return;
  }

  Serial.print("Humidity: ");
  Serial.print(humidity);
  Serial.print(" %\t");
  Serial.print("Temperature: ");
  Serial.print(temperature);
  Serial.println(" *C");
  delay(2000);
}

Advanced Projects

3. Home Automation with Arduino

Control home appliances using a relay module and an Arduino board.

  • Materials Needed: Arduino board, relay module, breadboard, jumper wires, household appliances (e.g., lamp).
  • Instructions:
    • Connect the relay module to the Arduino.
    • Write a program to control the relay based on sensor inputs or a schedule.
    • Integrate with other sensors or a remote control system for added functionality.

Code Example:

#define RELAY_PIN 7

void setup() {
  pinMode(RELAY_PIN, OUTPUT);
}

void loop() {
  digitalWrite(RELAY_PIN, HIGH);  // Turn the relay on
  delay(5000);                    // Wait for 5 seconds
  digitalWrite(RELAY_PIN, LOW);   // Turn the relay off
  delay(5000);                    // Wait for 5 seconds
}

Tips for Successful Projects

  1. Start Small: Begin with simple projects and gradually tackle more complex ones as you gain confidence.
  2. Experiment and Modify: Don’t be afraid to experiment with the code and hardware. Learning often comes from trying new things.
  3. Troubleshoot: If something doesn’t work, check your connections, review your code, and use the serial monitor to debug.
  4. Join the Community: Engage with other Arduino enthusiasts online or at Delmarva Makerspace. Sharing knowledge and experiences can greatly enhance your learning.

Recommended Resources

  1. Arduino Project Hub: A great platform to find and share Arduino projects. Visit: Arduino Project Hub
  2. Adafruit Learning System: Comprehensive tutorials on Arduino and other electronics projects. Explore: Adafruit Learning System
  3. SparkFun Electronics: Offers tutorials, kits, and components for Arduino projects. Check it out: SparkFun

Conclusion

Arduino opens up a world of possibilities for makers of all skill levels. From simple LED blinking projects to complex home automation systems, there’s always something new to learn and create. At Delmarva Makerspace, we’re excited to see what you’ll build next. Happy making!

Beginner’s Guide to Laser Cutting: Tips and Tricks for New Makers

Welcome to the World of Laser Cutting!

At Delmarva Makerspace, we’re passionate about empowering makers to explore new technologies and unleash their creativity. Laser cutting is one of the most versatile and exciting tools in our makerspace, perfect for creating everything from intricate artwork to functional parts. If you’re new to laser cutting, this guide will help you get started with confidence and safety.

What is Laser Cutting?

Laser cutting is a precise method of cutting or engraving materials using a focused laser beam. It can cut through materials like wood, acrylic, paper, fabric, and even certain metals. The precision and versatility of laser cutting make it an invaluable tool for makers, designers, and artists.

Essential Safety Guidelines

Before diving into your first laser cutting project, it’s crucial to understand and follow these safety guidelines:

  1. Wear Proper Eye Protection: Always wear safety glasses designed for laser use to protect your eyes from the intense light of the laser.
  2. Ventilation: Ensure proper ventilation in the workspace to avoid inhaling fumes from the materials being cut.
  3. Material Safety: Only use materials that are safe for laser cutting. Avoid materials like PVC, which can release toxic fumes when cut.
  4. Fire Safety: Keep a fire extinguisher nearby and never leave the laser cutter unattended while it’s operating.
  5. Regular Maintenance: Regularly clean and maintain the laser cutter to ensure it operates safely and efficiently.

Step-by-Step Guide to Your First Laser Cutting Project

Here’s a simple project to get you started: a personalized keychain.

Materials Needed:

  • A piece of wood or acrylic (small enough to fit in the laser cutter)
  • Design software (like Adobe Illustrator or Inkscape)
  • Laser cutter

Steps:

  1. Create Your Design:
    • Use design software to create your keychain design. Start with a simple shape and add text or patterns. Ensure the design is appropriately sized for your material.
    • Save your design in a format compatible with your laser cutter, such as SVG or DXF.
  2. Prepare the Laser Cutter:
    • Turn on the laser cutter and connect it to your computer.
    • Place your material on the laser cutter bed. Use the clamps or magnets to secure it in place.
    • Focus the laser according to the manufacturer’s instructions to ensure a precise cut.
  3. Set Your Cutting Parameters:
    • Adjust the laser settings for your material. This includes setting the power, speed, and number of passes. Refer to the material’s laser cutting guidelines for optimal settings.
  4. Run a Test Cut:
    • Perform a test cut on a scrap piece of material to ensure the settings are correct and the design cuts cleanly.
  5. Cut Your Design:
    • Once satisfied with the test cut, load your final material and start the cutting process. Monitor the cutter closely during the operation.
  6. Finish Your Keychain:
    • After the laser has finished cutting, carefully remove the keychain from the bed.
    • Sand any rough edges and attach a key ring to complete your personalized keychain.

Common Mistakes and How to Avoid Them

  1. Incorrect Focus: Ensure the laser is properly focused to get clean cuts. An out-of-focus laser can cause burns or incomplete cuts.
  2. Wrong Settings: Use the correct power and speed settings for your material. Too much power can cause burns, while too little can result in incomplete cuts.
  3. Poor Ventilation: Always use the laser cutter in a well-ventilated area to avoid inhaling harmful fumes.

Recommended Materials for Beginners

  • Wood: Easy to cut and engrave. Ideal for a wide range of projects.
  • Acrylic: Produces clean cuts and is available in various colors.
  • Paper/Cardstock: Perfect for intricate designs and prototypes.
  • Fabric: Great for custom apparel and accessories.

Useful Resources and Tutorials

  • Laser University: A comprehensive resource offering tutorials, guides, and tips for laser cutting and engraving. Perfect for both beginners and advanced users. Visit: Laser University
  • Instructables: A community-driven site with countless projects and step-by-step tutorials for laser cutting and other maker activities. Great for finding inspiration and detailed instructions. Explore: Instructables – Laser Cutting
  • Trotec Laser: Trotec’s website offers a variety of laser cutting and engraving tutorials, material guides, and project ideas to help you get the most out of your laser cutter. Check it out: Trotec Laser Tutorials

Conclusion

Laser cutting is an incredible tool that can bring your creative ideas to life with precision and ease. By following this guide, you’ll be well on your way to mastering laser cutting and creating amazing projects. At Delmarva Makerspace, we’re here to support your journey. Happy making!

Elevate Your Laser Projects with Amazing Fonts from These Top Resources

At Delmarva Makerspace, we know that the right font can transform a good project into a great one. Whether you’re creating custom signage, intricate artwork, or personalized gifts with LightBurn, the right typography can make all the difference. Here are our top three recommended sites to find interesting fonts for your laser projects:

1. 1001 Fonts

1001 Fonts offers an extensive collection of fonts that cater to a wide range of styles and preferences. From elegant scripts to bold display fonts, you’ll find something to suit every project. The site is user-friendly, with categories that make it easy to find exactly what you’re looking for. Plus, many of the fonts are free for personal and commercial use. Check out their selection here.

2. DaFont

DaFont is a favorite among designers and makers for its vast selection of free fonts. Whether you need something playful, spooky, vintage, or modern, DaFont has it all. The site also allows you to preview your text in different fonts before downloading, which can be incredibly helpful in choosing the right one. Explore DaFont’s offerings here.

3. Google Fonts

Google Fonts is a treasure trove of high-quality, open-source fonts. The site’s extensive library includes hundreds of fonts, all of which are free to use. Google Fonts also provides useful information about each font, including popular pairings and usage recommendations, which can help you make informed decisions about your design. Discover Google Fonts here.

With these resources, you’re well on your way to finding the perfect fonts to make your laser projects stand out. Remember to share your creations with us at Delmarva Makerspace. We love seeing what our community can create!

Happy crafting and happy font hunting!